

Table Fan Motor Coil Rewinding: The Secret Diagram You NEED to See!
Meta Title: Table Fan Motor Rewinding: Diagram & Guide
Meta Description: Learn how to rewind your table fan motor with our step-by-step guide! Includes essential diagrams, troubleshooting tips, and safety advice. Get your fan spinning again!
Introduction
Is your trusty table fan sputtering, refusing to spin, or just not providing the cool breeze it used to? Often, the culprit is a burnt-out motor coil. While replacing the entire fan might seem like the easiest solution, rewinding the motor coil can be a cost-effective and rewarding DIY project. This article delves into the world of table fan motor coil rewinding, providing you with the knowledge, practical insights, and, most importantly, the diagrams you need to succeed. We’ll cover the basics, address common questions, and guide you through the process, empowering you to breathe new life into your old fan.
H2: Understanding the Table Fan Motor & Why Coils Fail
Before diving into the rewinding process, it’s crucial to understand how a table fan motor works. Most table fans use a shaded-pole motor, known for its simplicity and reliability. This motor consists of a stator (the stationary part) and a rotor (the rotating part). The stator contains coils of copper wire, which, when energized by electricity, create a magnetic field. This field interacts with the rotor, causing it to spin and drive the fan blades.
The motor coils are wound with insulated copper wire, typically enameled to protect against short circuits. These coils are subjected to heat, friction, and electrical stress during operation. Over time, the insulation can degrade, leading to:
- Overheating: Prolonged use, dust accumulation, or a faulty capacitor can cause excessive heat, damaging the insulation.
- Short Circuits: Worn insulation can allow the copper wires to touch, creating a short circuit and stopping the motor.
- Open Circuits: A break in the wire, often caused by vibration or wear, disrupts the flow of electricity.
These failures often manifest as a complete motor failure, a slow-spinning fan, or a burning smell.
H3: The Anatomy of a Shaded-Pole Motor
Understanding the components is key. Here’s a breakdown:
- Stator: The stationary part, housing the motor coils.
- Rotor: The rotating part, usually made of stacked steel laminations.
- Coils: Wound copper wire, the heart of the motor’s operation.
- Shading Rings (or shading coils): Short-circuited copper rings on the stator poles. These are crucial for creating the rotating magnetic field needed for starting the motor.
- Bearings: Allow the rotor to spin freely.
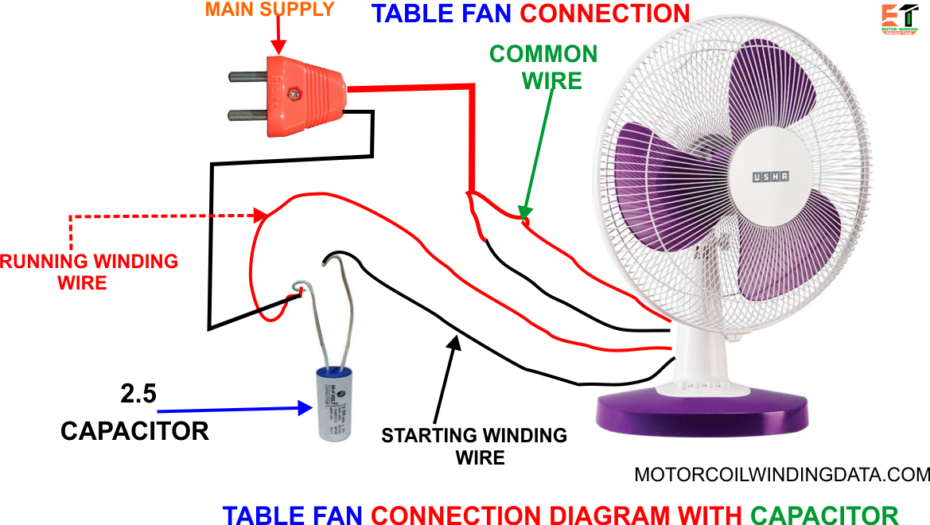
- Capacitor (often present): Used to improve the motor’s starting torque and efficiency.
H2: Gathering Your Supplies: What You’ll Need
Before you begin, gather the necessary tools and materials. This preparation will streamline the process and minimize frustration.
- Insulated Copper Wire: The correct gauge is vital. Check the existing wire’s diameter (use a wire gauge tool) or note the wire size from the old coils. Common gauges are 30-32 AWG.
- Winding Machine (optional, but highly recommended): This speeds up the process and ensures uniform winding. You can find affordable manual winding machines online.
- Varnish or Insulating Lacquer: For sealing and protecting the new coils.
- Insulating Paper/Wedges: To insulate the coils from the stator core and to secure the windings.
- Wire Strippers/Cutters: For preparing the wire ends.
- Soldering Iron & Solder: For connecting the new coils.
- Multimeter: To check for continuity and shorts.
- Pliers, Screwdrivers, and other hand tools: For disassembling and reassembling the fan.
- Safety Glasses & Gloves: Essential for protection.
- Diagram (see below!) – This is the secret weapon!
H2: The Secret Diagram & The Rewinding Process (Step-by-Step)
Here is the core of this article. We’ll outline the general steps; a specific diagram for your fan model is critical. (Note: A real diagram cannot be provided here, but the instructions below will guide you towards finding one and understanding its key elements.)
- Disassembly: Carefully disassemble the fan motor. Take photographs at each stage to aid reassembly. Note the winding direction of the existing coils.
- Remove the Old Coils: Carefully remove the old coils from the stator slots. Note the number of turns in each coil and the winding pattern. This is crucial for the replacement.
- Clean the Stator: Thoroughly clean the stator slots, removing any old insulation or debris.
- Insulation: Insert insulating paper into the stator slots to protect the new coils from the sharp edges of the stator core.
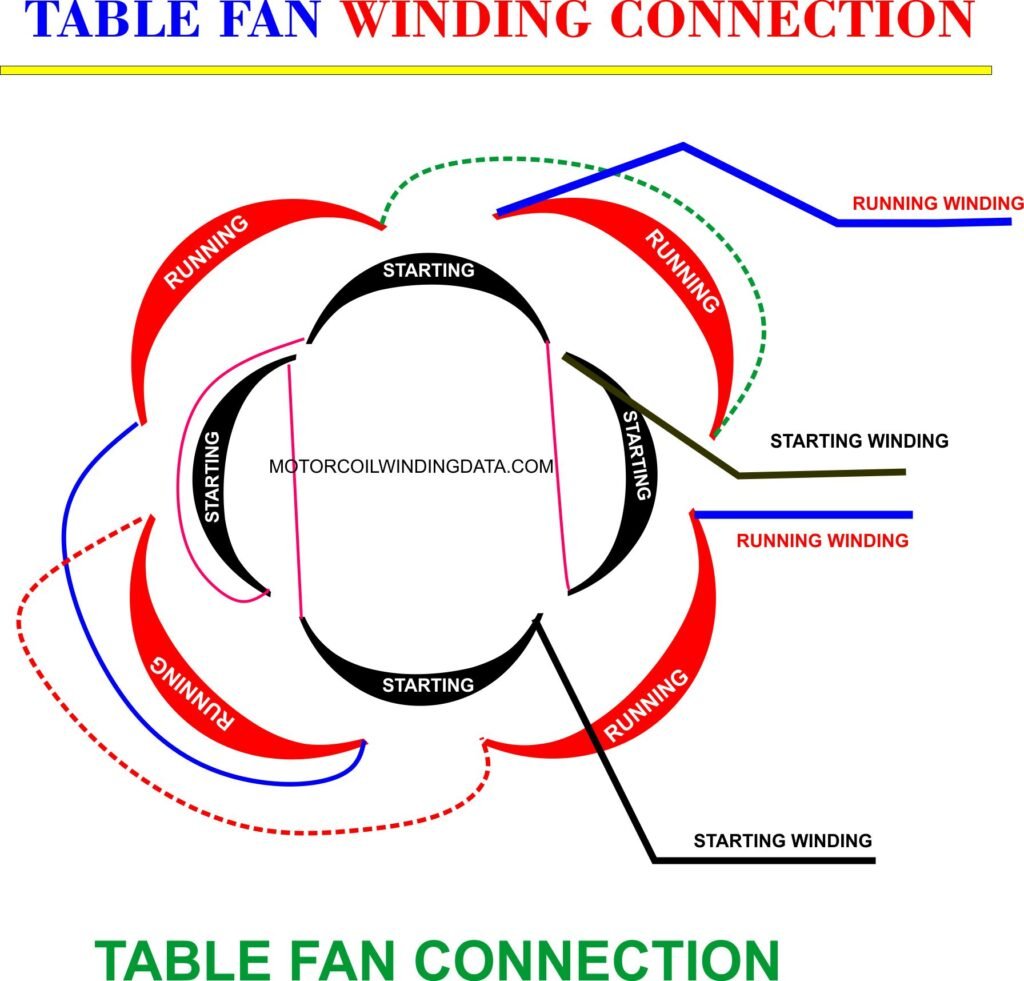
- Winding: This is where the diagram comes in! The diagram will show:
- Number of Turns: How many times to wind the wire for each coil.
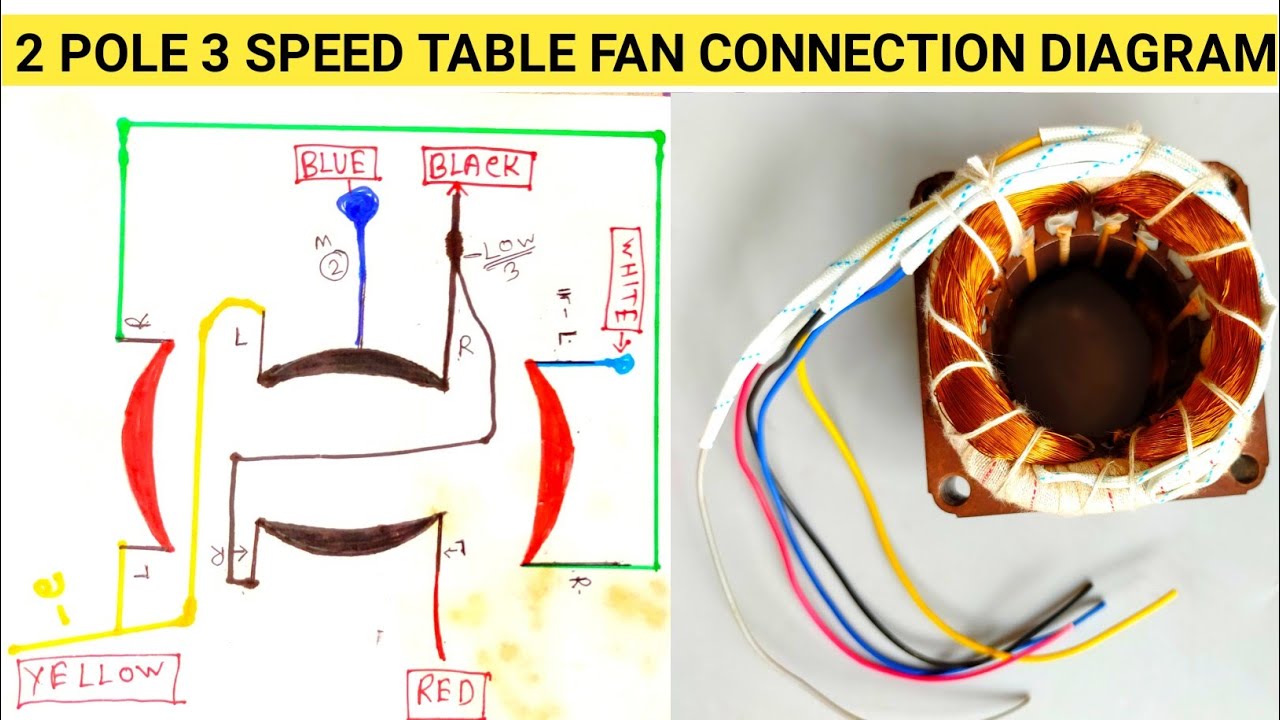
- Winding Pattern: The order in which the coils are wound into the slots.
- Connection Diagram: How to connect the coils together and to the power supply.
- Winding: Use the winding machine (if available) to carefully wind the new coils according to the diagram. Ensure each coil is neatly wound and fits within the stator slots.
- Insulation and Wedging: Insert wedges to secure the windings in the slots.
- Connections: Solder the coil leads according to the diagram.
- Varnishing: Apply varnish to the coils to protect them and improve insulation. Allow to dry thoroughly.
- Testing: Use a multimeter to check for continuity and short circuits. The coils should have continuity, and there should be no connection between the coils and the stator core.
- Reassembly: Carefully reassemble the motor, paying attention to the rotor’s position and the bearings.
- Testing: Connect the motor to power and test its operation.
Where to find the Diagram:
- Online Search: Search for “[Your Fan Brand/Model] motor coil winding diagram” or “[Motor type - e.g., shaded pole motor] winding diagram.”
- Manufacturer Websites: Check the manufacturer’s website for technical manuals or diagrams.
- Repair Forums & Communities: Online forums dedicated to electrical repair often have diagrams and troubleshooting guides. (Consider linking to a relevant repair forum here.)
- Local Electrical Repair Shops: They may have diagrams or be able to provide guidance.
H2: Troubleshooting & Common Problems
- Motor Doesn’t Start: Check the wiring connections, the capacitor (replace if faulty), and the shading rings.
- Motor Runs Slow: Check the winding turns and connections and ensure the bearings are lubricated and not seized.
- Motor Overheats: Ensure the windings are correct, and there are no short circuits. Check for dust build-up.
- Burning Smell: Immediately disconnect the power and inspect for shorts or overheating.
H2: Safety First!
- Disconnect Power: Always disconnect the fan from the power supply before starting any work.
- Work in a Well-Lit Area: Ensure good visibility.
- Wear Safety Glasses and Gloves: Protect your eyes and hands.
- Be Careful with Soldering: Avoid burns and inhalation of fumes.
- If Unsure, Seek Professional Help: If you are uncomfortable with any aspect of the process, consult a qualified electrician.
Conclusion
Rewinding a table fan motor coil can be a rewarding DIY project, saving you money and extending the life of your fan. By understanding the motor’s workings, gathering the necessary tools and materials, and most importantly, obtaining the correct winding diagram, you can successfully tackle this repair. Remember to prioritize safety and take your time. With patience and careful execution, you can revitalize your fan and enjoy a cool breeze for years to come. [Link to a reputable DIY repair resource here, e.g., a popular electronics repair blog or YouTube channel]. Good luck, and happy winding!
