
2012 Jaguar XF Fuse Box Diagram: Don’t Get Stranded! Find Your Fix NOW!
Meta Title: 2012 Jaguar XF Fuse Box Guide: Locate & Replace Fuses Easily
Meta Description: Lost power in your 2012 Jaguar XF? This guide provides a comprehensive fuse box diagram & troubleshooting tips to quickly diagnose and fix electrical issues. Get back on the road!
Introduction
Owning a 2012 Jaguar XF is a statement of luxury and performance. However, even the most refined vehicles can experience electrical gremlins. A blown fuse can swiftly cripple essential functions, from your headlights to your infotainment system. Knowing how to locate and identify the fuses in your 2012 Jaguar XF is crucial for quick and easy troubleshooting. This guide provides a comprehensive overview of the fuse box locations, fuse diagrams, and troubleshooting tips to ensure you’re never left stranded due to a blown fuse.
Understanding Your 2012 Jaguar XF Fuse Boxes
Your 2012 Jaguar XF, like most modern vehicles, utilizes multiple fuse boxes to protect various electrical circuits. These boxes are strategically placed for easy access and to group related circuits together. Understanding where these fuse boxes reside is the first step in diagnosing electrical problems.
- Why are Fuses Important? Fuses act as a safety net. They are designed to break the circuit if there is an overload or short circuit, preventing damage to expensive components like your engine control unit (ECU), audio system, and lighting.
- Where are the Fuse Boxes Located? The 2012 Jaguar XF typically has three main fuse boxes:
- Engine Compartment Fuse Box: Usually located in the engine bay, often near the battery. This box primarily protects circuits related to the engine, cooling system, and other essential components.
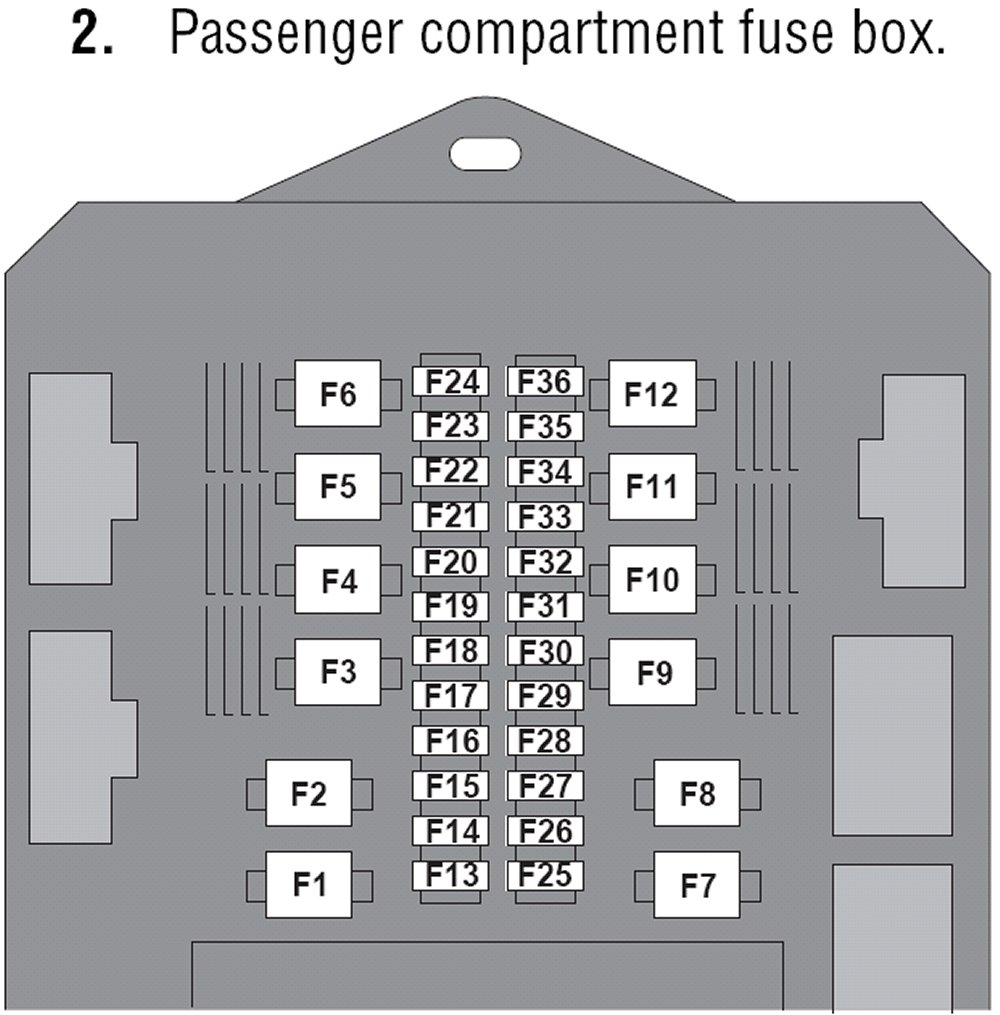
- Passenger Compartment Fuse Box: Commonly found on the driver’s side, either under the dashboard or in the footwell. This box protects interior components like the radio, power windows, and interior lighting.
- Rear Compartment Fuse Box (If Applicable): Some models may have a third fuse box located in the trunk or under the rear seat, primarily for circuits related to audio, rear lights, and other rear-mounted accessories.
2012 Jaguar XF Fuse Box Diagram Breakdown
The fuse box diagrams are the key to identifying the correct fuse for your specific problem. These diagrams are usually located:
- Inside the Fuse Box Lid: This is often the most accessible location. The diagram typically shows the fuse position, its corresponding circuit, and the amperage rating of each fuse.
- In Your Owner’s Manual: Your owner’s manual is the most comprehensive source for fuse box diagrams and fuse information. It details each fuse’s function and provides a legend for identifying the various symbols.
- Online Resources (Use with Caution and Verification): Numerous online resources, including enthusiast forums and websites, may provide fuse box diagrams. However, always cross-reference this information with your owner’s manual or the fuse box lid to ensure accuracy. (Consider linking to a reputable Jaguar forum here)
H3: Deciphering the Fuse Box Diagram
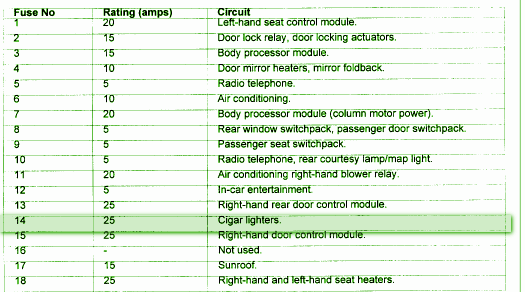
The fuse box diagram uses a combination of numbers, letters, and symbols to identify each fuse. Here’s a breakdown of what you’ll typically see:
- Fuse Position Numbers: Each fuse has a designated number, making it easy to locate the specific fuse you need to check.
- Circuit Abbreviations: These abbreviations indicate the circuit the fuse protects (e.g., “HTR” for heater, “ABS” for anti-lock braking system, “RRW” for rear window).
- Amperage Rating: This number (e.g., 10A, 20A, 30A) indicates the fuse’s capacity. Always replace a blown fuse with one of the same amperage rating. Using a fuse with a higher rating can lead to serious electrical damage and potential fire.
- Fuse Types and Colors: Fuses are color-coded and come in different sizes depending on the amperage. Familiarize yourself with the different fuse types (e.g., mini, standard, maxi) to ensure you have the correct replacement.
Troubleshooting Electrical Problems: A Step-by-Step Approach
When an electrical component fails, follow these steps:
- Identify the Problem: Determine which component or function is not working (e.g., headlights, power windows, radio).
- Consult the Owner’s Manual: Locate the relevant fuse for the affected component in your owner’s manual.
- Locate the Fuse Box: Find the fuse box containing the fuse you need to check.
- Inspect the Fuse: Use a fuse puller (often included in the fuse box lid or in the vehicle’s toolkit) to carefully remove the fuse. Visually inspect the fuse for a broken filament. A blown fuse will have a broken wire inside.
- Test the Fuse (Optional): Use a multimeter to test the fuse for continuity. (Link to a tutorial on using a multimeter here)
- Replace the Fuse: If the fuse is blown, replace it with a new fuse of the same amperage rating.
- Test the Component: Turn on the affected component to see if it’s working.
- Persistent Problems: If the fuse blows again immediately, there’s likely a short circuit in the wiring. In this case, it’s best to seek professional help from a qualified mechanic.
H3: Common Electrical Issues and Their Corresponding Fuses
Here are some common electrical problems and the fuses to check:
- Headlights Not Working: Check the fuses for the headlights, usually found in the engine compartment fuse box.
- Power Windows Not Working: Check the fuse for the power windows, usually located in the passenger compartment fuse box.
- Radio Not Working: Check the fuse for the radio, also typically found in the passenger compartment fuse box.
- Brake Lights Not Working: Check the fuse for the brake lights, located in either the engine compartment or passenger compartment fuse box.
- Cigarette Lighter/Power Outlet Not Working: Check the fuse for the cigarette lighter/power outlet, usually found in the passenger compartment fuse box.
Important Safety Precautions:
- Disconnect the Negative Battery Terminal: Before working on any electrical system, disconnect the negative terminal of the battery to prevent accidental shorts and electrical shocks.
- Use the Correct Amperage Fuses: Always replace a blown fuse with a fuse of the same amperage rating. Using a higher-rated fuse can damage your vehicle’s electrical system.
- Avoid Over-Tightening: When replacing fuses, don’t overtighten them. They should fit snugly in their holders.
- If in Doubt, Consult a Professional: If you are uncomfortable working on your vehicle’s electrical system, or if the problem persists, consult a qualified mechanic.
Conclusion
Understanding the fuse box diagram and knowing how to troubleshoot electrical problems are essential skills for any 2012 Jaguar XF owner. This guide has provided you with the knowledge and resources you need to diagnose and fix common electrical issues, keeping you on the road and enjoying the luxury and performance of your vehicle. By following the steps outlined in this guide, you can confidently address minor electrical problems and avoid costly repairs. Remember to always prioritize safety and consult a professional if you are unsure or uncomfortable working on your vehicle’s electrical system. Now, you can confidently diagnose and resolve fuse-related issues, ensuring your 2012 Jaguar XF remains a reliable and enjoyable driving experience.
